Introduction:
Dropdown lists are a common feature in web development that allows users to select a value from a predefined list of options. In this article, we will learn how to create a dropdown list in PHP and bind data from a MySQL database. This functionality is useful when populating dropdown lists dynamically based on data stored in a database. By the end of this tutorial, you will have a clear understanding of the necessary steps involved in creating and populating a dropdown list using PHP and MySQL.
Step 1: MySQL Query Creation
Before diving into the PHP programming, let's start by creating a sample MySQL database table and inserting some data. We will assume you have already set up a MySQL database and connected to it in your PHP script.
Create a table named "categories" with the following structure:
CREATE TABLE categories (
  id INT(11) NOT NULL AUTO_INCREMENT,
  name VARCHAR(100) NOT NULL,
  PRIMARY KEY (id)
);
Insert some sample data into the table:
INSERT INTO categories (name) VALUES ('Mobile');
INSERT INTO categories (name) VALUES ('Television');
INSERT INTO categories (name) VALUES ('Microwave Oven');
INSERT INTO categories (name) VALUES ('Washing machine');
Now, let's move on to the PHP programming part, where we will create a dropdown list and populate it with data from the MySQL database.
Step 2: Establish a MySQL database connection
To begin, we need to establish a connection to the MySQL database using the mysqli extension in PHP. Here's an example of how to establish a connection:
<?php
$servername = "localhost";
$username = "root";
$password = "";
$database = "company";

$conn = mysqli_connect($servername, $username, $password, $database);

if (!$conn) {
    die("Connection failed: " . mysqli_connect_error());
}
?>
Replace username, password, and database with your actual MySQL credentials.
Step 3: Retrieve data from the MySQL database
Next, we will retrieve data from the "categories" table using a MySQL SELECT query. We will fetch the results and store them in an array for later use. Here's an example of how to do this:
<?php
$query = "SELECT * FROM categories";
$result = mysqli_query($conn, $query);

if (mysqli_num_rows($result) > 0) {
    $categories = mysqli_fetch_all($result, MYSQLI_ASSOC);
} else {
    $categories = [];
}
?>
Step 4: Create and populate the dropdown list
Now that we have the data stored in the $categories array, we can proceed to create the dropdown list HTML element and populate it with the retrieved data. Here's an example of how to achieve this:
<?php
echo '<select name="category">';
foreach ($categories as $category) {
    echo '<option value="' . $category['id'] . '">' . $category['name'] . '</option>';
}
echo '</select>';
?>
In this example, we iterate over each category in the $categories array and generate an HTML <option> element for each one. We set the value attribute of each option to the category's ID and display the category name as the option's text.
Step 5: Handle form submission
Once the user selects a value from the dropdown list and submits the form, you can retrieve the selected value using PHP's $_POST or $_GET superglobal variables.
<?php
if ($_SERVER['REQUEST_METHOD'] === 'POST') {
    $selectedCategoryId = $_POST['category'];
    // Perform further actions based on the selected category
    echo "Selected category ID: " . $selectedCategoryId;
}
?>
Output:
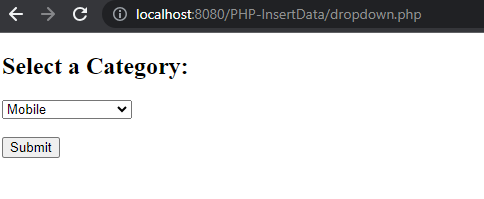
By following the above steps, we have successfully created a dropdown list in PHP and populated it with data from a MySQL database. The final output will be an HTML form containing the dropdown list, which users can select from and submit.

If the form has been submitted (using the $_SERVER['REQUEST_METHOD'] === 'POST' condition) and if the submit button (name="submit") has been clicked. If both conditions are met, it retrieves the selected category ID using $_POST['category'] and performs any necessary actions based on that value.
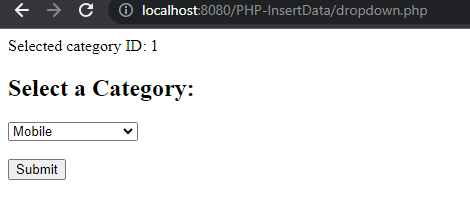
When the form is submitted, the selected category ID will be displayed as output using echo. You can modify this code to suit your specific requirements, such as storing the value in a database or performing other operations.

Save the changes, and when you submit the form after selecting an option from the dropdown, the selected category ID will be displayed on the resulting page.
Conclusion:
In this article, we have covered the step-by-step process of creating a dropdown list in PHP and binding data from a MySQL database. By establishing a MySQL database connection, retrieving data, and populating the dropdown list dynamically, we have achieved a functional dropdown list that can be used in various web applications. This article provides a solid foundation for understanding how to work with PHP, MySQL, and HTML to create dynamic dropdown lists.


Comments (0)