Custom Objects in Salesforce
While the standard objects form the core components of the Salesforce platform, the custom objects provide the scope of much-needed customization. Each business has its requirements, and often fitting the organizational data into the stand objects could be a challenge. Moreover, one of the biggest taglines of Salesforce is customization, where it allows its customers to customize the platform as per their requirement. Right from the customized component, to customized interface, to customized objects.
Salesforce allows custom objects, that can add extend the overall capability. For example, a car rental company has customized objects FuelConsumed and DriverID , to record the fuel usage, and to record the details of the drivers assigned for a particular trip. This is something, which cannot be achieved by the standard objects and can be implemented only through the custom objects. The custom objects can have their custom fields.
What you can do with the custom objects?
The custom objects provide the scope of endless customization on the Salesforce platform. Some of the key features of the custom objects are listed below:
- It aids in the development of customizing page layouts to control the access of the users to certain fields, while they enter the data.
- Facilitates importing the records associated with the custom object.
- Developing dashboards and customized reports for the data generated from the custom objects.
- Develop customized tabs for the custom tabs. These tabs can display the records associated with the custom object.
- Track the tasks and the events associated with the records generated from the custom object.
How to create a custom object?
To create a custom object, follow the steps given below.
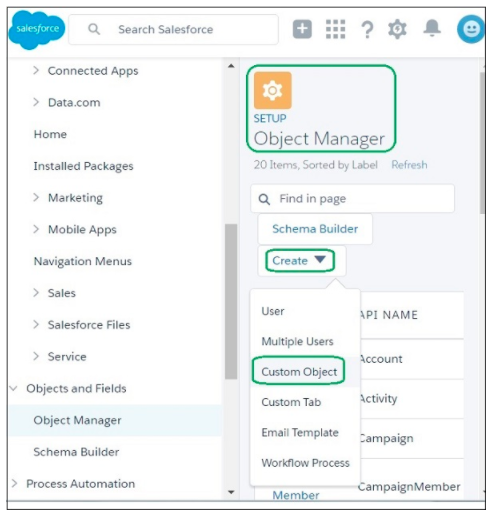
- Go to Setup and then click on the quick find box and type “Object Manager”.
- It will open the “Object Manager” page.

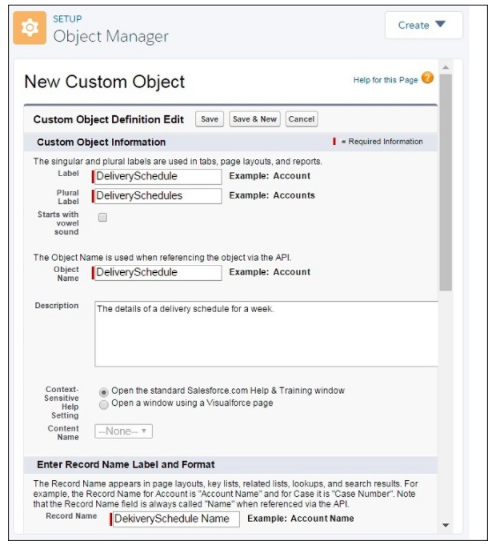
- Click on the “Create” option on this page. It will provide multiple options as shown above. Click on “Custom Object”. This will open the “New Custom Object Window”.

The custom object is of limited use if the custom field is not created. Hence, in the next step custom field will be created for the custom object.
- Go to the newly created custom object. If the new custom object’s name is MyObject, then the path to go that custom object will be, Setup Home → Objects and Fields → Object Manager → MyObject.
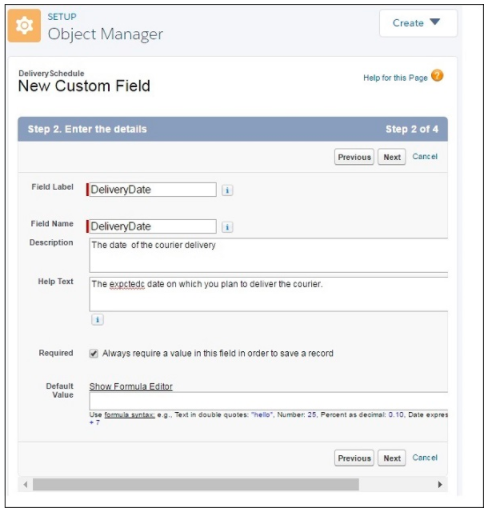
- Once the page opens, scroll down to the option “Fields and Relationship”, and then click on “New”. It will open the “New Custom Field” page.

On this page, we can define the field Label (Display Name) and field name, along with a short description. In case this is one of the mandatory fields, which is required to be filled then check the option “Always require a value in this field to save a record”.
Once the field has been created successfully, it can be verified from the custom object page. The new field will be reflected under “Fields and Relationships”.
Salesforce platform limits the number of custom objects that can be created. Current these are the limits that are set on the Salesforce platform for the custom objects.
- Contact Manager: 5
- Group: 50
- Essentials: 0
- Professional: 50
- Enterprise: 200
- Unlimited and Performance: 2,000
- Developer: 400
However, these numbers can be extended to a certain limit that is 3000. There is no option within the tools to extend the limit, but it can be done by raising a ticket with the Salesforce support team.
Key considerations before creating a custom object
Creating a custom object is an easy and straightforward step, but certain things must be considered. First of all, once the custom object is created its relationship needs to be established with the other entities. This should be done even before creating the fields. This is an important exercise, as it has been mentioned previously the object is nothing but a database with different fields. Hence, if this database is related to any other object, that it needs to be defined, and if there is a secondary key that is primary in any other object, then it needs to be declared as field as well. Otherwise, the whole purpose of creating a custom object might not be meaningful at all.
Each custom object needs to have a “Standard Name”, and without that, the custom object will not be created. So, before creating the custom object, one needs to plan the name of the object. A meaningful name is always suggested, that will closely refer to the purpose of the creation of the custom tab. By default the read, write, edit, and delete permissions will be disabled for all the profiles which have “View All Data” and “Modify All Data “ have enabled. The permission sets for these users can be modified, and they can be given complete access. Alternately, the created custom object can be assigned to specific users.
Creating a custom object from a spreadsheet
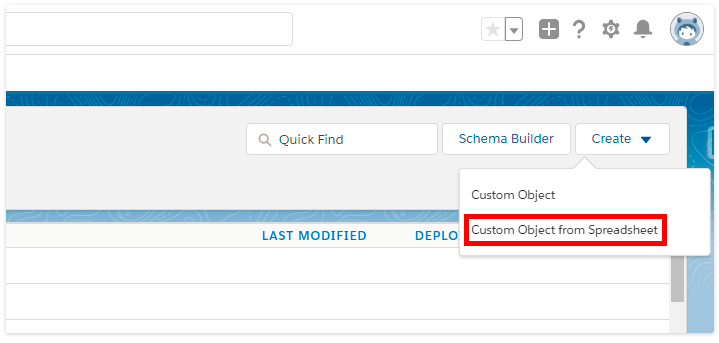
You have a spreadsheet that has got all the fields. For example, a spreadsheet named “Sales_Data” with fields such as Opportunity_ID, Sale_Date, Sale_Value, Sale_Owner. This spreadsheet can be easily converted into a custom object in Salesforce with all the mentioned filed. Go to Setup -> Object Manager -> Select Custom Object from Spreadsheet.

In the next step, select the excel sheet and import it into salesforce. Create the custom object, and define the object properties. We can select excel sheets, Google Sheets, and CSV files for creating a custom object from excel.

